Monday, November 26, 2012

Thankful for.....Dry Toast

Sew, Thanksgiving is over, the rush of Christmas has begun. Holidays are difficult for me, being away from all my extended family, but I try my best to keep my pretty little head up. I think the winter time is just rough on a lot of people anyway. Less sun, less warmth. But we always seem to make it to Spring. :) I am thankful for many things this year and wanted to express them.

1. God. - First and foremost, above and beyond all, there is no other that has stuck by me through thick and thin. He is faithful and I truly just want to do his will.

2. Family - Wait let me re-phrase that. A healthy family. I read or hear about people every day whose child is very sick, going to multiple appointments to doctors or spouses with cancer or something terrible. I am not above any of them. I pray for them, but I am blessed. I am so thankful that at anytime God could have made things very different for my life, but so far, he has blessed me. I may not have riches beyond measure and such, but I do know that I have happy (bratty-ahem) healthy children which bring a smile to my face daily and I am thankful for that.

3. Home - All my physical needs are met. There's a roof up above me, I've a good place to sleep, food on my table, and shoes on my feet. I am thankful. It may have come out of the goodwill outlet bin, but lets face it, even if I had bazillions of dollars I would probably just spend them thrifting. :)

4.Dry Toast- Wait did she just say Dry toast? Yeah she did. What in the world ? Well see there is a little story about this man and wife, with 2 kids that had decided their family was complete. Since the arrival of the 2nd child they decided on the Mirena for contraception. She was told by many people that getting "fixed" felt so permanent that it scared her. But the Mirena is good for 5 years and the doctor told the couple that if in 5 years they knew they were done, they could have the procedure then. They agreed seeing that they had used this in the past and it worked well for them.
So as time went on, their relationship had its ups and downs and because of the finding out the wife's severe battle with post partum depression, it just seemed like she began to lose hope that things would work out. Soon after, Her husband lost his father and that just put more strain on the family as well as him starting a new job. It seemed like things were just getting more and more difficult as the days went by. Then it happened.

One night after church something just told her that she needed to take a pregnancy test. As silly as it was to her, she thought, OK I will do it and nothing will happen. I mean they had the Mirena  so the chances of winning the lottery would be higher, but she thought at least it would put her mind to ease.

Test 1 positive.

Test 2 Positive.

Test 3 Positive.

With each test confirming what she thought to be impossible just turned her world upside down. Appointments at the doctor the next day (considering how dangerous getting pregnant on a Mirena can be) confirmed she was in fact going to have another baby. The Mirena was just "missing". (Do not as me how this happens as I do not know). Now this mom is well into her first trimester and is feeling the hormones and is remember the "joy" of morning sickness. (besides whoever called it that, clearly was mistaken). The only thing that sounds appealing to her in the way of food is dry toast. She had no turkey over the holiday as the smell was just too much to handle. (if you haven't figured out the story, the mom is me! And baby makes 3~)

I am still in shock of what all has happened. Everyday is a battle in my mind of what we are going to do and how things will work out, but I know they will.

The word says he won't put more on us than we can bear, so he must think I am really strong. :)

Anyway, Everyone is excited and already talking names and all sorts of craziness. All I know is I can smell everything and most of it is not pleasing. I thought I was tired a month ago....ha.

I am just thankful for what I have been blessed with. If God is going to bring me to it, I know he will bring me through it.

I was able to sew up a darling little pinafore dress and bloomers last week. I will try and get it posted this week. :)

Until next time....

Keep Calm.....and be Thankful, you may just get another helping on your plate. :)

Tuesday, November 20, 2012

Sweet Poof Flower

So I recently started following another blog, (surprised?). Its just so easy to put your email in the little box and have it delivered to your email daily. And since I sit at a computer all day, its nice to get a little break when I get a new blog email.

I have one of these too if you want to follow me...(wink wink:)

So anyway the new blog I began following is I Am Momma Hear Me Roar. She has a ton of cute tutorials on many different things. I saw this Autumn Bloom Belt and thought it was super cute.


She gives a full tutorial on it and the pictures are probably way better than mine, but I took pictures of what I did in case you are lazy like me and want to just keep reading.

So I didn't make the belt. I just made one of the "poof flowers". These need a better name, but honestly, I can't think of what would be a good one at the moment. Maybe I will revisit the idea later and give them a proper name. Right now, Poof Flowers will just have to work.

Start with a felt or a soft but firmer fabric. I used one of the extra scarves I had left over from this bow scarf.


I cut a long strip down one side of the scarf.


Then I cut the little "tails" of the ends.


Then you take your scissors and just cut lines down the scarf strip. I tried to get them all the same length, but I wasn't too worried about the spacing. Just roll with it. It will be fine.

Here is my strip after I got all the little notches cut.


Now where the fun begins. Make sure you plug in your glue gun and let it get hot while you are cutting. Take an end and dab a little glue and roll the strip onto itself.
Then add a little more glue, roll some more, add a little more glue....etc. Get the picture?


Once you get to the end or the size you want, glue the end in place, flip over and start feathering or splitting all the little ends.


You will end up with a floppy Poof Flower. Attach a pin to the back to add to a shirt, or a clip for a hair piece. Or you could get real ambitious like IAMMOMMA and make a few more and make a cute belt.


Its very soft and very cute. I will probably make more of these.

Hope you enjoy my little tutorial. This one is super easy. Glue gun, scissors and fabric. Easy Peasy.

Until Next time,

Keep Calm......and make easy Poof Flowers....


Friday, November 16, 2012

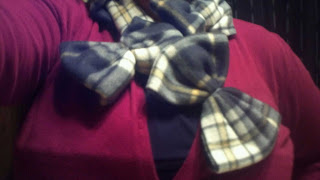
Not your average scarf.....Couture Bow Scarf

So I follow many blogs. And when I say many, probably like 10. I can get overwhelmed easily. Anyone else? So I was reading "Ruffles and Stuff" by Disney, (yes that's her name, awesome right?) a week or two ago, (which was the first blog I ever started following) and she posted a tutorial on these fabulous bow scarves. The tutorial is so easy, I had to make one for myself.


I went and picked up some scarves from the dollar tree for $1 each. They are a very soft but thin fleece. I followed her tutorial here, so get over there and check it out. I mean if I can do it, anyone can.

All you basically do is sew 2-3 scarves together, (depending on length, I only used 2 and you can see its not real long) and then by folding and sewing a straight line, you create cutesie bows.

I used no specific technique or measuring. It turned out different than I thought, but I still love it. And its super cosy and warm. I love the couture look of it. Definitely beats the traditional "knot", "infinity" and other styles you see everywhere right now.
(although the Russian woman I work with thought I must be sick since I was wearing such a thick bulky scarf while working...lol...I am Chrissy Couture, Hello?!) ;)


 Next time I make one, I will probably plan my bows out a little better. But I think for a first time, she is definitely a keeper. What do you think?


Head over to Disney's blog, if you love ruffles, bows, and a cute little model, you will love her too!

Until next time,

Keep Calm.....and Bow it up! :)

Monday, November 12, 2012

Manic Monday : A lower calorie way to enjoy your Salad...

So, It is no secret that I am not a huge salad eater. I joke a lot about it being "rabbit food" and many times I just can't enjoy it. Honestly, I would just rather have a cheeseburger. My salad, when its made, usually consists of a little salad, and then a various large assortment of toppings. Basically, its toppings with a little salad added in. The main topping I struggle with is dressing. I love good ole, Ranch. I love a lot of good ole Ranch. I can not have a dry salad, then it just seems like I am eating grass. I have been trying to eat healthier and watch my calories some, and I was trying to think of ways to eat my salad with more salad, less dressing.

I know the age old "dressing on the side" tip where you dip your fork in the dressing and then get salad, but its still just too dry for me. I think I discovered something that I know works for me, so if you like cottage cheese it will work for you.

CAUTION: I know some people are very ANTI- cottage cheese, and that is your right. Beware that I love it and will be using it in the example below. If you need to end reading now, I hate to see you go, but the show must go on! :)

Side note: None of the brands below gave me anything or sent me anything to write this post. I want to make that very clear....but if they would like to in the future that would be ok too. haha.

You will need:

Salad mix


Low fat Cottage Cheese

Pepperoni slices
(you can use a variety of what you like, but this is what I used cause it was easy and yummy)

Easy directions...

Get a large helping of salad on your plate. See easy right....(I know, this is the hardest step for me.)


Put your peperoni's on...You get 16 for 1 serving, so I usually only put about 10 down.


Add a half a cup of cottage cheese to the top....(I also finish with the other 6 peperoni's, you didnt' think I would pass on a full serving of something did you?? :)


I sprinkle a little pepper on because I am cool like that....

And its ready to devour!

Cottage cheese has enough texture like dressing and goes much farther than a tablespoon of a higher calorie dressing. Plus all the protein benefits to help keep you full. A half cup goes pretty far and its Yummilicious.


I hope if you like cottage cheese and aren't a huge salad fan that you try it out....

It just may change your world forever....(or at least lunch time)

Enjoy!

Until next time....

Stay calm.....and eat more Rabbit Food

Wednesday, November 7, 2012

Hand over that Gobbler....

So I saw on Pinterest and even pinned a cute turkey where the feathers were made out of fall leaves.


http://pinterest.com/pin/278167714455876767/

It was so adorable and I was all prepared to do it with my kids.

Then I got to thinking... the leaves here are now brown and crunchy.....I could use fake leaves....OR....what if I had them trace their hands (in fall colors) and use those just cut out as feathers??

Now I did think of this on my own and was very proud I was so creative, however I am sure there are a bazillion other people who have thought of this too.

Ever have a moment when you envision your children....sitting quietly but excitedly at the table....tracing their hands....giggling....sharing the supplies....having a magical moment of memories?

Unfortunately what you get is the two fighting over identical paper plates....the 20 month old wanting to climb on top of the table....crying and yelling ....snack distraction mess.....yeah you can imagine.

So with all my dreams and hopes smashed for a sweet memoratic (is that a word?) moment.....Livy's project got as far as 2 hands traced and then she ate some cookies in jail....(ahem, I mean her high chair.)

The Hand Turkey and mini tutorial ...


All you need is :

Paper plate
Colored paper (or you could have them color white paper )
Scissors
Glue
Ink pen/marker


First trace (or have your child trace) their hands. I had them trace both hands.


Once you get all of the hands traced cut them out. I cut some and Noah cut some. I didn't look to hit a certain amount. I think we ended up with 12 or 13 total. We also cut through 2 pieces at once to "double our hands" and shorten our time. This would all depend on how big your hands are and how big your plate is.


Once all the hands were cut out, I took a paper plate ....and flipped it over.


I had him place the "feathers" where he decided. I resisted the urge to guide him where I wanted them to go and in the end he did awesome.


We then glued down the hands where he placed them.


After all the hands were glued, I drew out a "bowling pin" like shape on the brown paper. Noah then cut him out.


That became Mr. Turkey's neck. An extra piece of red cut in a triangle for a little beak and 2 black eyes.


Once all dry, I trimmed around the white edges of the paper plate so that the white is hidden by the feathers.

Now you have a wonderful fun and cute fall/Thanksgiving decor.


The experience didn't quite go as expected but it turned out cute and he was proud of it.

Try it out....the kids will love it....or fight continuously as you try to be a "crafty" mom. (haha)

Stay calm.....and Gobble On....

Tuesday, November 6, 2012

Ruffle Shirt to Dress Refashion

A few weeks ago, when my father in law passed away, I was awake early and the kids were still in bed, I took a chance on refashioning a ruffle top shirt I had picked up at the Goodwill outlet. So it was literally less than a $1.00 and when I saw it, I immediately knew I wanted to re-fashion it for Livy.


Here is the original shirt.


I love the blues, browns, and blacks, not to mention the ruffly fabric. I began by deciding I would cut the "top" of the shirt off right under the arms and then leave one of the side seams and cut the other side based on the size I needed.


Then I cut the sleeves off the top piece and measured and cut the sleeves for the dress and attached them. A little elastic at the neck and it was done.

I also took some brown lace and made a sassy little belt. Added a little button to it for flavor...or aka Chrissy Couture.

The ruffle fabric was different to work with. I had never used it before. I kept having to make sure I wasn't catching the ruffle in my machine... so that was a little tedious. I even whipped up a little matching bow by swirling a piece of the ruffle fabric in a circle and glued it to a piece of felt. Button center. Wal-lah. 

Now to try it on the model.


This was one of the first pics because I couldn't get her to stand up. But she looked so darn cute, I couldn't help myself but share.

That's a little better.....uh oh.... we tend to make things a little short. I'm working on that...but it looks like a pair of leggings will be joining this look.


Especially when she likes to show leg so much! (some would say like her momma, but I will plead the 5th on that one;)  haha. :)

Close up of the belt and dress....


It overall wasn't too difficult. It sure beats paying for a yard or so of ruffle fabric. And since it was already a shirt, I didn't have to hem and one side was already done. Just a little elastic neck and re-attaching sleeves.

I am pretty obsessed with how cute it turned out. What do you think?

Stay Calm....and Ruffle it up....


Monday, November 5, 2012

Easy Peasy Cheesy Chicken and Noodle Casserole

This is not a glamorous or healthy recipe, however it can be altered probably to use "low fats" where possible.

It is quite delish, so I thought I would share. And did I mention its easy peasy?


Easy Cheesy Chicken and Noodle Casserole

1 bag of Noodles. (I used just plain wide egg noodles)

2 cans Cream of Chicken Soup

1 can Cream of Mushroom Soup

2 Cans pre-cooked chicken (this is a time saver, you could always cook chicken breasts and then shred)

1 Bag of Shredded Cheese. (I believe I used Mexican blend, but your favorite will work fine)


Boil your Noodles like normal in a large pot. Drain. Mix the noodles and soup and chicken and put back on the stove, stirring until nice and hot/warm. Once "cooked", Add a handful or 2 of cheese to the top and let it simmer on low for a few minutes to melt the cheese.

Then Devour!


This is a really thick casserole. I always add a little extra cheese to my bowl, well because I love it.

This makes about 6 servings. A little goes a long way.

Calories : Do not even want to know. :)

Enjoy!

Stay Calm......and Add a little more cheese....