Tuesday, July 31, 2012

Monkeys and Paper Wheels......

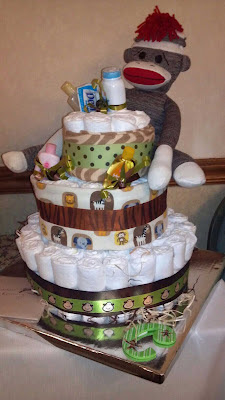
Sew….this last weekend I was privileged to help host a baby shower for one of my sweet friends. It is her first child, a boy, and they are decorating his nursery in sock monkey’s so we adapted that theme to her baby shower.

Wasn’t the theme cute?


Blue punch….Yum


  Oreo Red Velvet Cheesecake…..

Tables of food…..
 
Fun Decorations…..


I spent a couple hours (the night before) making these super fun paper wheels.


These are so easy and look intimidating, but they aren’t too difficult. I scoured a few online tutorials trying to figure out how to make them, but in the end, I found my technique turned out to be the easiest for me.  The techniques I found had you making a long strip, then scoring it to make the folds, then connecting the ends making a circle, then trying to hold and fold the ends in all while trying to hot glue them together. I just felt I am not coordinated apparently to do this technique.

The easiest way I discovered was decide how big you want it. If you want smaller ones, one sheet is enough. If you want a larger one, you will need 2 sheets. I used a Scrap booking packet. Some are card stock, some are just regular paper.

Start with one sheet and do a fan fold. (you know, the type of folding you would use if you were going to make you a paper fan) Back and forth, back and forth . Try and get them around the same size, but perfection isn’t required thank goodness! (If you are making a large wheel, fold 2 pieces together at the same time, that way all of your creases will be around the same size)

Once you get your piece folded it will look like this.
 

Then if making a smaller one, cut this in half. Now you have 2 little ones. Take one of the smaller ones and fold it in the middle again. Match up both sides and drop a little hot glue and connect them. Once they are glued, go to the other end and pull the other pieces around and glue them. This will make your circle shape. You can also trim your ends prior to give different looks. (rounded, spiky, or just leave) Then you glue those ends together. Embellish the center with a button, sticker, or a circle piece of paper.


Wal-lah! Told you it was simple.

For a larger one, you do the same thing, EXCEPT, you can only make half circles. Then you connect the half circles in the middle. See below where you can tell there is 2 if you look close?


Then just add a smaller one to the middle.
In a few hours I was able to make a dozen or so. And they turned out so cute!

I especially love the printed ones that look like newspaper. The shower turned out fabulous and I got to make something new with my Paper Wheels.

Try it out....

Stay Calm.....and no Monkey Business....

Thursday, July 26, 2012

Color Blocking down deep in my soul.....

Sew Lovlies.... I was with my best gal last night and she gracefully purchased moi 2 fabulous jersey skirts at JC Penny's that were on clearance for my upcoming birthday. First of all, I haven't been in a Penny's (as we call it) for a while and I have to say, I was impressed at how they have "stepped up their game" in the fashion world. I saw racks of Chevron and bright colors, which is so in right now. I was very surprised with how youthful the clothes looked. I remember hating to shop with my Mother in Law because she would want to go to Pennys and it was all hideous, matronly frocks. I also love that the maxi dress/skirt is so hot right now, because I love them and wear them all the time! Now when they all go on clearance perhaps I can snatch a few. You know this thrifty super cheap gal is not paying retail...period.

So I said all of that to say this.......

Do you color block? Do you know what color blocking is? Color blocking in Chrissy Couture land is basically pairing up bright solid colors together, even if you don't think they go, THEY DO. :) Now, I would caution that even Chrissy Couture doesn't extreme color block, but I love to mix a good print with colors that wouldn't "normally" go together. Most people match a color with a neutral (Gray, Black or Brown). Color blocking is using a neutral as your accent! Most of the time, its with bright colors, but you can color block with brights, pastels, earth tones....you name it. I would stick with a genre though...Unless you are a extreme fashionista and want to try and mix brights with earth tones...if you love it, that's all that matters.

For instance, I color blocked yesterday and wished I would have gotten a picture. Orange/Coral Maxi dress with a purple CC cardigan, cinched with a black belt.  I love me some color blocking!

I also color blocked today with my new hot pink maxi jersey skirt! (Thanks GG! ;))
 

What do you think? I love how the almost jade green pops against the hot pink. I just threw on a black cardi to keep from freezing in my office, but it could so do without it. I would probably belt it if I didn't have the cardi to break up the "waist line".

Here are some of my favorite color blocking combos below.


Thinking about giving it a try? The best part about color blocking is it fits any body shape/type...and authenticity...any skin tone!

Check out the color wheel below to get started. You can basically block any 2 or 3 colors, and then use neutrals as an accent. I have an old "fashion rules letter" from my husbands grandma's fashion "bible" that stated you should only wear 3 colors and your hair color should be counted as one of those colors! Ha. Isn't it funny how fashion changes but stays the same? Maybe we just always look for ways to "break the rules".
 
Just keep your skin tone in mind when color blocking. I am fairer skinned, so I tend to stay away from yellow. If you have a darker skin tone, totally rock that Yellow with a few others. I think you can throw a print in as well. Its all a trick of the eye anyway and if you are confident in it, others will love it.

 (I find myself thinking of "field of dreams" ..if you build it they will come mantra....but more like.."if you love it, others will"....yet I digress...)

So next time you are thinking of doing the same old solid/print with a neutral (black, grey or brown), try something new and throw on another color instead. Need a new cardigan to throw on and start baby step color blocking? You can see a super easy tutorial here on how to make one out of an shirt.

Can you tell I love to color block? ha. Yeah, I am pretty much obsessed....but if loving color is wrong....honey I don't wanna be right. :)

Have fun!

Stay calm....and Color block it up!

Wednesday, July 25, 2012

My "fair" lady.....

Sew........ I was lying in bed on Sunday taking my usual afternoon nap when I heard miss Livy start crying in her crib. My husband came down the hall to get her and when he did, I knew he had already been out to the fair to see how my entries had done, I asked him how I 'faired'.

I was utterly disappointed. He said none of my photos placed at all. My heart sank. None? Not even a 3rd? None. So as I begin to question him about what did win, he forgets what all I entered. Turns out later I find out that I still had hope for my black and white "still life" entry.

It placed 2nd! Its not a blue ribbon, but I will take it. Thankfully at least ONE of my photos placed. I was beginnging to think that everyone was being way to nice about how they loved my photos.

 I was hoping more of my photography would have placed, but it is all subjective and I think perhaps I put some of them in the wrong categories. My child collage probably would have done better under "candid child" rather than portrait, but it is what it is. Out of the hundred or so of entries, I was pleased at least one of my photos placed.

My wreath got 2nd as well.
You can learn to make your own here. There were 4 entries and so I was pleased that I placed.

My purse that I whipped together the night or so before entries were due got 3rd. Now normally I would be thrilled that something I threw together would place, but since there was only 3 entries and I got 3rd place, I wasn't feeling so fantastic about it.
I still win a whopping $1.00 for 3rd place..... so I will take it. haha.

My beloved color bus/van picture did not place at all.
I was really disappointed at first. The first place picture for "still life" was some dead fish on ice. Like I said, it is all subjective. I was standing looking at the photos Monday night and at 2 different times when people would pass (not knowing who took what photos) they would comment on how awesome "that picture is of those buses/vans". I think I got all the confirmation I needed more than a blue ribbon from hearing strangers speak up about my photo, (esp since they didn't know the photographer was standing next to them). :)

So overall, some would say I did really well. I tend to have high expectations for myself so I am learning to say I did great, (even though secretly I wish I would have done better)

Oh well, its a learning experience every time you try something new.....next year I will know more and will be able to "Rock it!~"haha.

Stay Calm......and step outside your comfort zone sometime....

Tuesday, July 24, 2012

A GW outlet Amazement.....

So I introduced 2 gal pals of mine to the exciting Goodwill Outlets in Indy this weekend. They had never been and since I rave about it, they wanted to try it out.

We saw some interesting things......

People......

But at the end of the day, I had 4 bags full of stuff for about 12$ and my friend Carrie really cleaned up with Ball Mason jars that she uses for canning.

It was a fun day and I was slightly disappointed with my finds. I did pick up a replica LV purse. That perked me up a bit.

The next morning I received a Facebook notification that I have been tagged on a post.

Carrie scored a couple of pairs of American Eagle and Abercrombie jeans to resell. She took them home and washed them, and when they came out of the dryer she found 5 $100.00 bills in one of the pockets.

 Talk about me being a little "green"....no pun intended. So lets just say...next time, I am looking at the clothes...scouring the pockets! :)

Until next time....

Stay calm.....Maybe next time is your blessing!

Friday, July 20, 2012

10 minute maxi...2 hours later....

For Easter I wanted a new "Easter Dress" but did not have a lot of money and therefore figured I would just wear something I always wear. I came across this fabulous blog "Sewing in No Man's Land" and she has a tutorial for a "10 Minute Maxi Dress".


Even though I had never sewn a piece of clothing for myself, I thought, "this is just what I can do for Easter".

I ran to walmart and found this amazing fabric on clearance.

I love how it almost looks like zebra print. The colors are amazing that the weight of the fabric is just perfect for a maxi skirt. I would love to tell you what textile it is, but really I have no idea. I am still in the "it looks pretty" stage of fabric and haven't quite learned my textiles yet.

I follow the tutorial the best I think I know how to, adjusting here and there for my size which is probably double than the tiny model. :) (ok probably not double, but it feels that way when you are dealing with all this yardage of fabric)

I learned how to attach a shirt to a maxi skirt the proper way. Her tutorial I think explains it well, I just always do everything backwards and then learn how to do it the right way. The first time I attached my shirt to my skirt (you know it can never be good when there is more than a first time), I turn it all back right side out or so I thought and I had stitched the shirt on inside out. UGH. So, my trusty seam ripper who I really should name as we have become great friends, and I begin working on taking it all apart to re-pin correctly and re-sew.

Once I got it correctly sewn, and hemmed it was finally finished. 2 hours later. I have the look put together 2 different ways here.

For Easter, I just had a think black belt and a short waisted black Cardigan. (apologizes for the horrible picture quality)


Then for work today, I just threw it on with a purple Chrissy Couture Cardigan and a thick black belt to cinch the waist. I love that I am in full Chrissy Couture today.


Hope you try and make a Maxi! I love mine! Perhaps my next one will not take nearly as long to make!

Until next time....

Stay Calm and Maxi it up....


Fair Entries.....as humbling as it was.....

 I do not know why I really wanted to put items into the county fair this year. What is it about us that yearn for others approval?

The following are my fair entries....(minus the photography which you can see here). I was extremely excited about them. When I arrived to drop them off, I dropped my jaw at the amazing items that were already there.  It was a terribly humbling and somewhat awkward experience. One day I will gain more confidence in what I make....One day... :)


Harvest Wreath - Door Decoration Seasonal


Sewing -Purse

I guess at the end of the day as long as I am happy with what I did, that is all that matters.  Even if it did look like the other purses were purchased at Macy's and just dropped off.

I am sure I will let you know how I 'fair' at the Fair. (he he)

Stay Calm.....and love what you love....no matter what.

Wednesday, July 18, 2012

VW Van, Maxi Dress, and a Camera


Sew...... if you remember, our county fair is coming up next week. For years, and I mean years I have desired to enter items into the fair but never did. Some of the reasons were fear I wasn't good enough, some were I was afraid to offend friends that were doing it, and some was just plain laziness.  I would browse through the family arts building, looking at all the awesome things people made and feel so "untalented". I have always had a creative desire, but it just never has been supported or nurtured, so I just kept it back in the secret parts of myself in fear of "what if what I do isn't good enough?"

Well Chrissy Couture is here now and she is becoming more confident in her creative side. So confident that she stops at a random house to see if she can photograph some things out behind their barn.

Am I crazy? I mean the house looked like a pretty nice well-kept farm. It didn't "look" like a bunch of psychopaths that killed people lived there, so I pulled in and knocked on the door.


No Answer. (heart sinks)

I wait a little longer. No answer still.

I reluctantly walk back to my van and as I do, I do notice that there are cars (big farm trucks) parked at this garage behind their house. I think, "well it is nice out, perhaps they are sitting outside". I take 2 steps that direction when I am met by a huge dog greeting me with not a wagging tail and smile, but a ferocious barking growl. I decide to play dead standing still if you can imagine. I knew better than to take off running. Nothing says “Attack” like a running target. The owner walks out of the open door to his garage and asks if he can help me.

I wish I could give you the dialog, but for the most part, I told him I was not there to sell him anything, but wanted to see if I could take a couple pictures of his VW van behind his barn. I told him I see it everyday when I drive into work and wanted to take some photos of it. He wanted to know if I was wanting to buy it and I said no, just take some pictures. He looked at me terribly confused and I begin rambling, as I do when I am nervous, that I have no ulterior motives, that I just want to take some pictures for fun, that I might enter them into the fair, but that is all. His wife exits the house at this time and he tells her that this girl wants to take pictures of the vans and if she would take me back there. She responds that he can walk me back there. "Great", I’m thinking.  "Now he can take me behind the barn and slaughter me". (yes I have a twisted mind, or maybe to much of a realist)


As we are walking back way behind his house to the barn, he mentions how he has people stop all the time wanting to buy these, but no one ever does, just hippie kids. (And me in my maxi dress and camera I am sure screams hippie chick).  We finally get back to the barn and there is a “be still my heart” moment. As silly as it sounds, there is farm junk,  broken down old vehicles and beauty beyond measure. Since I was already stepping way out of my box to get where I was, I should have just went with it and took pictures of everything while I was there, but my nerves at the time wanted me to get the picture I wanted of the van and get out of there.

I ended up with 3 pictures. I obviously made it back to my van and home to get them on the computer. As I was walking back up to his house, I asked what their names were in case someone wanted to know where these were at and he very strongly remarked that I needed to just forget where I took them and to not tell anyone. Yes Sir!.  I seriously think he thought I was an artsy hippie, that had just done some serious drugs.

Was it worth all of the effort? See for your self. These are 2 of the 3. The very first one I took was blurry. Probably from trying to hurry and being nervous as he watched me.


Think these are fair worthy? "Still Life" entries in color and B&W.
I will be mounting them tonight, along with these others I decided on to enter tomorrow. 


These will be part of a collage color entry "portrait"


Aflac? Animal Entry

I am really excited about the fair this year. I made a handbag last night that I am sure I will blog about later and I have the fabulous Harvest Wreath to enter as well.

As one of my friends would say...thanks for visiting "Chrissy's Craft Corner" haha. :)

Until Next time...

Stay Calm.....and really just Stay Calm, not everyone is a pyschopath.


If you enjoy this post, consider subscribing. It’s easy and you will always know when a post has been published. Simply add your email to the box to the right and Absewlutely Chrissy Couture will be sent to your inbox!


Tuesday, July 17, 2012

No sewing, Easy Harvest Wreath

 It is somewhat humorous to me that I have made so many wreaths since I started crafting. I never ever thought about doing any of them when I first started sewing. It really has been alot of fun. Remember the paper flowers we made? Well a friend of mine and I put them to good use Sunday night LATE and made a fabulous burlap wreath.


Want to know how we did it? Its super simple.


We did not have an actual "wreath" to work off of, and we knew we wanted the burlap ruffled, so we cut the bottom off of 2 wire hangers (yes back in the very back of your closet surely you have one wire hanger ready for when you lose your mind). We stretched those out and our wreath made a boxy like shape. This was totally ok with us. We folded the bottom "hanger hook" in and then clipped it down.
Then we took strips of burlap and threaded them on the hanger using a zig zag "stitch". I was a little hesitant at first, but the burlap's loose weave allows you to thread the hanger right on it.
We did the top hanger first, both sides, then bottom hanger. Then we attached the 2 hangers together with some electrical tape. The burlap then was a little harder to get over the electrical tape, but with a little maneuvering it was fine.

There were a few places where the ends of the strips needed a little persuading to get in line with the rest of the ruffles, so we hit a few spots with a glue gun.

Then the burlap wreath was finished.
We debated on where to put the Paper Flowers we made, but I love where we decided on .
Doesn't it just simply and elegantly say Harvest Wreath? This is heading into the fair this week and I am really excited about it. I don't expect to win anything over it, I am just excited about how cute it turned out and how easy it was.

What do you think?

Until next time.....

Stay Calm.....and try out some burlap...

If you enjoy this post, consider subscribing. It’s easy and you will always know when a post has been published. Simply add your email to the box to the right and Absewlutely Chrissy Couture will be sent to your inbox!


Monday, July 16, 2012

Fabulous Paper Flowers

This weekend was fairly normal. We had some friends over for a birthday and had a great time. One of the friends of mine is a crafta-holic! I mean she is super talented with crafty things. She can look at something and see what it can be, which I totally am jealous of. There I said it. I love being crafty and creating things, but there are times I feel like I am just replicating something I have seen, where she can take nothing and turn it into something amazing.

Where am I going with all of this? We made these fabulous paper flowers.


These were so amazingly easy. The hardest part is literally untwisting the paper. Want to know how we made these fabulous flowers?

Well, the story goes like this…she saw I had a whole roll of Paper Capers Twisted Paper sitting on my shelf .


I had no clue what it was because, since I am just entering this world of creative wonderfulness, I know very little of what is out there. She asked what I was doing with it and I told her I didn’t know what it was because it came in the bag of goodies I got from Hwy 50 yard sales. I have just had it on the shelf ever since. She explained that back in the 90’s it was really popular to make bows out of, that is it basically twisted paper and you untwist it and can make things out of it.

We proceeded to play with it a little when she folded her piece and cut it into a petal like shape. Once it was folded over it made the most darling petals, so of course we had to make a few flowers.
 

SUPER EASY TUTORIAL BELOW
You will want a couple different length of strips. I believe we had 4 for the bottom, 3 for the middle and 2 for the top. So the bottom strips will naturally be longer and the middle a little shorter and the top the shortest. It all depends on how big you want your flower to be and how big you cut your original bottom strips. Cut your rope pieces as I like to call them and start untwisting. You will get this.


Once you get your strips all untwisted and flat, round the ends. You can do this with each end, or you can fold them in half and do both ends at once. It doesn’t have to be perfect, it’s a flower, and that is what makes it great. Once you get the ends shaped, twist the middle of it .

Then once you get the middle twisted, cross the middle pieces over and it begins to look like petals.
 
Then take a piece of felt, fabric, extra paper and begin gluing your pieces on it. I just placed the 4 bottom pieces together in the middle of the paper, then as I added pieces to the next layer, I kept the twisted piece in the middle of the flower.
When you are done it will look similar to this.
 
You can leave it or add a cute button or accent to give it that “flower punch”.
 
It was so fun, we made 3.


Fabulous right? And so easy! You can add these to almost anything. I will be adding mine to a wreath....but the possibilities are endless...

Until then,

Stay Calm…..and check out twisted paper! J


If you enjoy this post, consider subscribing. It’s easy and you will always know when a post has been published. Simply add your email to the box to the right and Absewlutely Chrissy Couture will be sent to your inbox!